
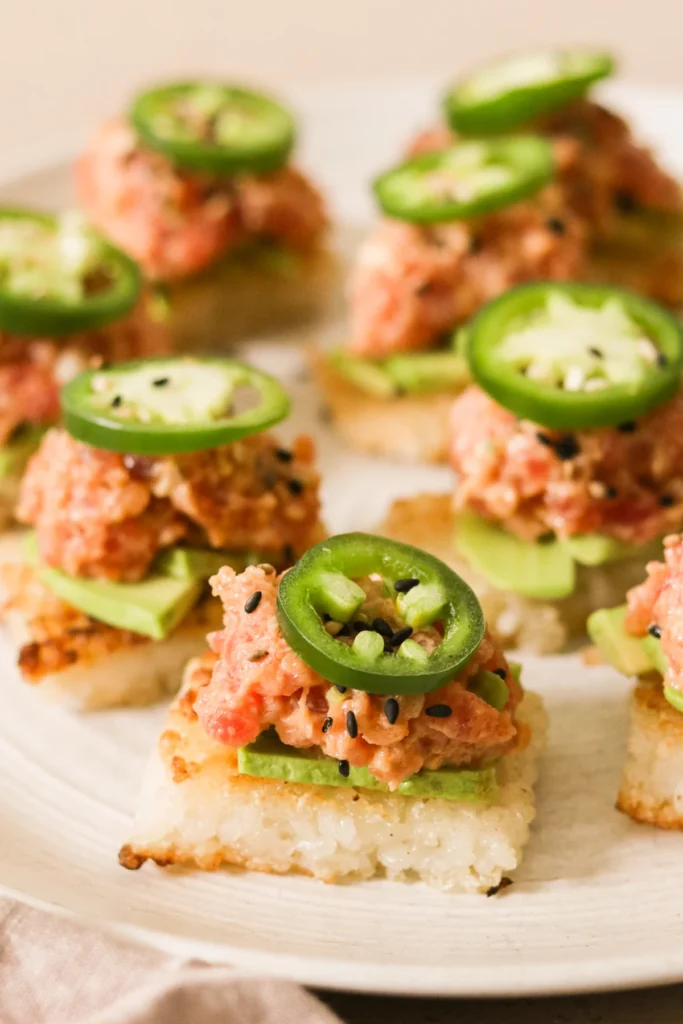
But at over $11 each, it wasn’t something I could enjoy often. So, I began testing my own version at home. Over time, I learned the key is the rice. The base must be crisp and well seasoned. I use sushi rice and a spicy tuna mix made with sashimi-grade tuna. Then, I add smooth avocado or thin avocado slices for balance. A few slices of jalapeño add that kick I love. Each bite has heat, crunch, and creaminess.
When I can’t find sashimi tuna, I use canned tuna instead. It’s easy, quick, and still tastes amazing. The swap surprised me the first time I tried it. It reminded me of my Salmon Sushi Bake and Spicy Crab Sushi Bake—both comforting and full of flavor. If you enjoy fusion dishes like Spam Musubi Bake or cozy meals like Chicken and Sausage Gumbo, this recipe fits right in. It’s great for a quick dinner or a calm weekend night.
It’s no surprise this dish went viral. From Sushi on Jones in New York to food videos online, everyone seems to love it. My friends often ask me to make it after seeing my version. You can top it with eel sauce, a drop of truffle oil, or even wrap it in butter lettuce.
Now, Spicy Tuna Crispy Rice is one of my favorite dishes to make. Inspired by Nobu, yes—but built from my kitchen, with care and heart. Every crispy square feels special.
What Are Crispy Rice Bites?
Crispy rice bites are small rectangles or squares of fried rice that have been shaped, molded, and cut to hold their form. Once the rice portion is cooked and cools down, it becomes firm enough to pan-fry to golden perfection. This creates a crunchy outside and soft center, making it ideal for toppings like spicy tuna or avocado.
These bites are often topped just like nigiri — with fish sitting right on top — but the concept is slightly different. They are individual portions, often served as an appetizer or part of a larger sushi recipe.
If you’ve ever wondered why they taste different from other sushi, it’s because they’re prepared in the same way, but with a focus on texture. I’m a huge fan of this style, especially after testing batches where each one is shaped the exactly the way I like. And if you’re like me, once you try them, you’ll understand the hype.
They’re simple to make, even after a long day, and you’ll be amazed how these small bites can pack so much flavor into one mouthful — whether you’re making them for yourself or sharing with others. And that’s what makes them so special: other forms of sushi just aren’t quite the same.
Why You’ll Love This Recipe
I can say from years of cooking and teaching, this simple recipe is a must-try. It checks every box if you want a bold, tasty appetizer that feels like it came from a fancy restaurant. It’s foolproof and doesn’t make you spend top dollar. It uses strong, healthy ingredients that you can trust. The best part is the contrast — a golden crispy base and soft fresh tuna on top. Every bite is packed with flavor. The mix of spicy tuna, avocado, and seasoned sushi rice brings rich umami, savory taste, and a smooth finish. All in one small bite.
If you like to cook for others but want less mess, this dish is perfect. I’ve made it at food demos and home dinners. It always gets great reviews. Most people can’t believe how easy it is.
That’s why I share my best tips and tricks for even, crispy pieces that stay firm. You can make it all with things you already have. No need for special tools. That’s why it works so well — it’s real food that’s simple. And it’s not boring. This recipe has it all: heat, crunch, and rich flavors that guests always love.
Kitchen Equipment
To make Spicy Tuna Crispy Rice successfully at home, having the right tools can make all the difference. Here’s exactly what I use, along with why it matters:
- Tiger Rice Cooker: This has been my go-to since college. It’s super convenient and reliable, especially when making sticky rice for shaping into crispy cakes. It takes the guesswork out of cooking rice on the stove.
- Rice Spoon or Large Wooden Spoon: Helps mix in the seasoning without crushing or breaking the delicate rice grains. A wide spoon is gentler than metal and gives you better control.
- 8×8 Square Baking Pan or Quarter Sheet Pan: These pans are perfect molds for shaping the crispy rice. I usually press the warm rice into an 8-inch or 9-inch tray lined with plastic wrap so it’s easy to chill and slice.
- Deep Skillet: A must for pan fry jobs like this. A deep skillet keeps the hot oil from splashing and protects your hands while giving each rice piece a perfect golden crust.
- Baking Tray: Handy for holding and organizing the cut rice blocks before and after frying. You can also use it to carry them from fridge to stove without mess.
Each tool supports the texture, shape, and flavor of your Spicy Tuna Crispy Rice, and using the right gear keeps your prep stress-free. I’ve learned over time that this setup really does make the whole process smoother—and more fun!

What Makes This Recipe Great
🧊 Chill the rice after cooking and before frying — this step helps it hold its shape better and gives each bite that perfect golden crunch. I’ve found that chilling for at least an hour makes slicing clean and easy.
🍳 Flatten the rice gently to create an even base for the toppings. A light hand keeps it together while letting it fry into that signature ultra crispy texture without breaking apart. It reminds me of prepping nigiri, just with more crisp!
🔥 Pan-fry the rice squares until both sides are evenly browned — this adds deep umami flavor and that irresistible restaurant-style bite. When I first tried this method at home, it completely changed the game.
🥑 Top each rice piece with creamy spicy tuna and smooth avocado slices — the combination is rich, balanced, and crowd-pleasing. This pairing is one of the main reasons people go back to Nobu, but here, you’re recreating that at home.
🌶️ Want more heat? Add thin jalapeños or a pinch of red pepper flakes for additional spice. I personally love the subtle fire it adds — especially for date nights or party platters.
🧂 Sprinkle with sesame seeds or chopped scallions just before serving. This garnish adds freshness, color, and texture. Even small touches like this elevate the dish into something that looks (and tastes) high-end.
🍽️ Serve it up as a delicious appetizer or make it a full meal. Whether you’re cooking for friends, family, or just treating yourself, these bites offer comfort, flavor, and a restaurant vibe—right from your own kitchen.
Nobu copycat: Spicy Tuna Crispy Rice
I still remember the first time I had the Spicy Tuna Crispy Rice at Melbourne Nobu—a small serving that cost $30, but every bite was worth it. The signature starter, topped with finely chopped, raw tuna and a creamy spicy dressing, looked so stunning that most people paused for phone snaps before eating. It’s one of those globally renowned dishes that feels special every single time. But I didn’t want to pay that price every time I craved it, so I decided to make a copy at home using quality ingredients.
I really love how creamy and crispy the textures are together, and the fact that it’s simple enough to recreate makes this recipe a favorite.
Today’s version sets aside all the guesswork—you don’t want to miss how easy it is to get top flavor without the restaurant bill. If you’ve ever been to Nobu, you’ll know what I mean. And if you go often enough, like I used to, you’ll be glad to know it’s possible to get enough of that flavor right here at home.

Nobu vs my version
At Nobu, the rice is shaped into small cubes. They are likely deep fried until golden and crispy. You get finely minced tuna, like a creamy spread, served on the side. The experience is clean and simple. You use toothpicks to dip each cube into the tuna toppings. This makes the dish feel fancy. Using sashimi-grade tuna adds a special touch. You find this at a high-end sushi restaurant. It often comes with a dipping sauce on the side.
In my kitchen, I made a version that brings that taste home. I make the rice cakes flatter. This helps them cook better when you pan fry them. They still get the same golden color and crunch. Each piece has toppings already on it. So you don’t have to dip. The spicy tuna, spicy mayo, and umami flavors are all mixed in. I have made this both ways. I find the home version better sometimes, especially when sashimi-grade tuna is hard to find. That’s why I added a canned tuna option. You can make it any time, no special store needed. It’s inspired by sushi rolls but made easier for busy nights, sudden cravings, or serving friends.
⭐ Nobu’s Version
- Rice shaped into small cubes, likely deep fried
- Finely minced tuna served separately like a spread
- Served with toothpicks for dipping
- Elegant but minimal presentation
- Typically uses sashimi-grade tuna
- May include a dipping sauce on the side
- Found in high-end sushi restaurant settings
⭐ My Version
- Rice cakes made flatter for even pan frying
- Toppings are pre-assembled on each piece
- No dipping needed – flavors are incorporated
- Offers both sashimi-grade and canned tuna options
- Inspired by sushi rolls with a homemade twist
- Perfect for weeknights, parties, or anytime you want it right now
- Still achieves a golden colour and crispy texture

Key Ingredients for Spicy Tuna Crispy Rice
To make Spicy Tuna Crispy Rice at home, you really don’t need a fancy kitchen—just a few thoughtful ingredients and a bit of technique. I’ve made this dozens of times, and it’s always a hit at dinner parties or even solo snack nights. Here’s everything you need to get that crispy, creamy, spicy, and umami-rich flavor in every bite.
🍚 Rice Base
- Sushi rice (aka short-grain rice): Use plump, sticky rice for the best texture. I recommend Nishiki or any Japanese brand for consistency.
- Rice vinegar: Adds acidity and depth to the grains. I usually go for sweetened vinegar for better balance.
- Salt + Granulated sugar: These are key to getting the seasoning right. Just a pinch of each can make the rice pop.
- Sesame oil or toasted sesame oil: Adds a nutty, aromatic finish. I prefer toasted for its deeper profile, but both work great.
- Optional: A dash of mirin for sweetness or a few drops of olive oil/avocado oil for added silkiness.
🧊 Pro Tip: Let the rice fully cool before frying. Chill it in the fridge for at least 1 hour (or 30 minutes in the freezer). This makes shaping rectangles or rice cakes so much easier—and crispier.
🐟 Spicy Tuna Mixture
- Sashimi-grade tuna: Look for yellowfin, bigeye tuna, or bluefin at your local seafood market or Asian grocery store. Frozen works too—just make sure it’s labeled “sushi-grade.”
- Canned tuna: If you’re short on time or budget, high-quality canned tuna makes a great alternative. Avoid any that’s too dry or loose.
- Japanese mayonnaise (like Kewpie): Made with only egg yolks, it gives a custardy texture and rich mouthfeel that’s hard to beat.
- Sriracha, chili garlic sauce, or sambal oelek: These bring the heat. You can dial it up or down depending on how much spice you like.
- Soy sauce or tamari sauce: Brings that umami and saltiness. I often use low-sodium sushi soy sauce for a smoother taste.
- Lime juice or lemon: Just a splash lifts the richness of the mayo and balances the flavors.
🧑🍳 My Experience: I’ve even made this with leftover grilled salmon—mixed with regular American mayo and a bit of sriracha, it was a surprise winner at our last game night.
🥑 Garnishes & Toppings
- Avocado slices: Use firm avocados that are just ripe. If it’s too soft, it won’t hold shape; too hard, and the texture clashes.
- Jalapeño slices or serrano peppers: I love the visual punch and spice they add. Remove the seeds for a milder bite.
- Green onions, scallions, or minced chives: These add freshness and a gentle zing to cut through the fat.
- Sesame seeds: Toasted black or white sesame seeds give a nutty crunch that finishes everything off perfectly.
- Optional: Add eel sauce, red pepper flakes, or a drizzle of chili oil for more personality.
🧂 Storage Note: You can make the spicy tuna mixture a few hours in advance and keep it chilled. But always wait until serving to add the avocado and toppings to keep everything fresh.
How to Make Spicy Tuna Crispy Rice

Step1 Crispy Rice
Start by rinsing short grain rice under cold water using a fine mesh strainer until the water runs clear. This step is key for removing excess starch, which helps the rice hold together later. Once cooked, while the rice is still warm, mix in a blend of rice vinegar, granulated sugar, and salt—this flavors the base just like sushi rice.

I sometimes add a drizzle of sesame oil or avocado oil for a smooth, nutty finish. Press the rice into a lined 8×8 dish or square pan, then cover it with plastic wrap. Use your wet hands or the back of a spoon to press down and create an even surface. Chill the rice in the refrigerator for 1 hour or freeze it for 30 minutes—this helps create crispy rice cakes that are easy to slice and won’t fall apart in the pan.
After chilling, take the rice out and cut it into rectangles or tightly packed balls, about 0.5cm to 1/5” thick. Heat a large skillet with neutral oil, sesame oil, or avocado oil to around 375°F (190ºC).


Carefully pan fry each piece in a single layer over medium-high heat, flipping gently once the bottom turns golden brown. This part takes patience, but it’s worth it. Don’t overcrowd the pan—do it in batches and let each side get crispy and beautiful. Transfer the finished rice cakes to a paper towel-lined plate and let them rest while you prepare the topping.

Step2 Spicy Tuna
For the tuna mixture, you can go with sashimi-grade tuna if available, or use canned tuna as a budget-friendly and super convenient option. I’ve made both versions, and honestly, with the right flavors, canned tuna holds up really well. In a medium bowl, combine the tuna with Japanese mayonnaise, sriracha, and a splash of soy sauce or tamari.
You can also add lime juice or a dash of vinegar to brighten up the mixture. For an extra kick, try chili sauce, sambal oelek, or even chili garlic sauce. Mix everything well using a fork or pulse in a food processor for a smoother finish.
Make sure to taste and adjust—you want it creamy, spicy, and packed with umami. I’ve also used salmon or even ice-cold tuna from the fridge when I didn’t want to run to the store. The key is keeping the tuna fresh, drained, and well-balanced with seasoning.

Step3 Assembling the Crispy Rice Cakes
Now the fun part—assembling! Once your crispy rice cakes are cool but still warm inside, grab a spoon and top each piece with a generous layer of the spicy tuna mixture. Use a sharp knife to prep thin avocado slices and place them on top for a rich, buttery contrast. If you’re into heat, add a thin jalapeño slice, and finish with a sprinkle of sesame seeds—I like mixing black and white sesame seeds for color and crunch.
You can even add green onions, minced chives, or scallions for a fresh bite. For serving, I’ve plated these on butter lettuce leaves for a refreshing touch at dinner parties or Saturday night drinks. Just remember—serve them fresh!
The toppings are best enjoyed right after they’re added. If you need to prep ahead, store the tuna mixture separately in the refrigerator and assemble the cakes just before serving so they stay crispy, flavorful, and vibrant.
Tips for the Best Spicy Tuna Crispy Rice
- Wash your sushi rice thoroughly using a fine mesh strainer to remove dirt, debris, and excess starch. This step ensures the grains become sticky without tasting starchy. I always rinse until the water runs clear—it makes a huge difference in the final texture.
- Use cooking rice that’s short grain—this variety is naturally stickier and holds together better when molded and fried. Long grain rice tends to fall apart, especially when you’re shaping them into cubes or rectangles.
- Pack the warm rice tightly into a baking pan or form a rice block by hand. Press out air bubbles and smooth the surface with wet hands or a spatula. This makes slicing much easier later and helps avoid cracking while cooking.
- Let your rice cool completely—at least 1 hour in the refrigerator or 30–45 minutes in the freezer. Cooling firms it up so the pieces stay intact when you slice and fry. I usually chill mine overnight if prepping ahead.
- Slice into even pieces—about ½ inch thick. This not only helps with crisping but gives a consistent base for your spicy tuna topping. I learned to cut gently with a sharp, damp knife to avoid pulling the rice apart.
- Before frying a full batch, always test one rice piece in hot oil. If you hear a rapid sizzle, the oil is hot enough. This quick tip saves the rice from soaking up too much oil and turning soggy.
- Once fried, place each crispy rice cake on a wire rack instead of paper towels. This helps keep the bottom crisp and prevents it from steaming and softening.
- When it comes to the protein, choose sushi grade or sashimi grade tuna, salmon, or any high-quality fish that’s safe to eat raw. I’ve even used freshly thawed frozen options from a trusted Japanese market—they work great if handled properly.
- Lightly mash or finely chop your fish to keep that nice balance between creamy and chunky. I often prep my mix the night before—letting it chill overnight improves firmness and blends flavors beautifully.
- After molding, always chill the rice again before frying. This little pause helps the rice stick better and ensures even browning. It’s one of those things that seems small but makes a huge difference when you’re after that perfect golden crunch.
- Use extra care, trust your sense of readiness, and never overcrowd your skillet. I always fry in batches—yes, it takes a bit longer, but the crispiness payoff is totally worth it.
What Sauce is commonly eaten with
More Recipes You Might Like

How to Make Spicy Tuna Crispy Rice at Home (No Sushi Skills Needed)
Description
This Spicy Tuna Crispy Rice is a fun, bite-sized snack that’s crunchy, creamy, and full of flavor. Each crispy rice square is topped with spicy tuna and a touch of heat. It’s easy to make at home and perfect for parties or quick sushi cravings. You’ll love how simple and tasty it is!
Ingredients
SUSHI RICE
SPICY TUNA
OTHER
Instructions
- Shape the cooked sushi rice into small bite-size rectangles. Press them tight so they hold their shape.
- Pan-fry the rice pieces in a little oil until both sides are golden and crisp. Set them aside to cool.
- In a bowl, mix chopped tuna, mayo, and a bit of sriracha. Stir well until creamy and smooth.
- Spoon the spicy tuna mix on top of each crispy rice bite. Add sliced green onions or sesame seeds for a fresh look and extra flavor.
Nutrition Facts
Servings 15
Serving Size 10 pieces
- Amount Per Serving
- Calories 308kcal
- % Daily Value *
- Total Fat 17.7g28%
- Saturated Fat 2.5g13%
- Cholesterol 15mg5%
- Sodium 290mg13%
- Potassium 320mg10%
- Total Carbohydrate 22.4g8%
- Dietary Fiber 2g8%
- Sugars 3g
- Protein 14.7g30%
- Vitamin A 100 IU
- Vitamin C 2 mg
- Calcium 15 mg
- Iron 1.2 mg
- Vitamin D 5 IU
- Vitamin K 8 mcg
- Magnesium 20 mg
* Percent Daily Values are based on a 2,000 calorie diet. Your daily value may be higher or lower depending on your calorie needs.
Note
- Use cold sushi rice. It makes the rice crispier when you fry it.
- Don’t skip the rice vinegar. It gives the rice that sushi-style flavor.
- Mix the spicy tuna fresh before serving. This keeps the flavor bright.
- Add a small piece of avocado or cucumber on top for balance and crunch.
