I love making bright art. I love playing with colors. But I also want to be safe. It was a rainy Tuesday. I was in my kitchen. I wanted to dye some eggs. Last year, I saw a neat trick online. People used shaving foam to dye their eggs. It looked so fun. I tried it back then. The eggs looked great. But then I peeled one. The egg smelled like men’s soap. I took a small bite. It tasted like chemicals. That felt very wrong to me. I threw them all away. I did not want to eat soap.
So I found a better way. I use whipped cream now. It is a much safer choice. It is entirely food safe. You get the same pretty colors. But you do not get the toxic chemicals. This is my true story. I want to share my whipped cream dyed eggs safer alternative shaving cream eggs method with you.
Why Shaving Foam is a Bad Idea
You might think an egg is solid. It looks like a little white rock. But it is not a solid wall. The shell has tiny holes in it. We call these holes pores.
The Science of Egg Shells
Real data shows something crazy. One single egg has up to seventeen thousand tiny pores. Air goes in and out of these pores. Liquids can go inside too. This is how the egg breathes. This is a real fact.
Shaving foam is full of bad stuff. It has artificial scents. It has strange chemicals. It is made for hair. It is not made for food. When you put foam on an egg, it sits there. The chemicals seep through the tiny holes. The soap goes right into the egg white. You can smell it when you peel it. You can taste it when you eat it. That is gross. It is very bad for your stomach.
A Kitchen Mess with a Happy Dog
I love my dog very much. He sits by my feet when I cook. He waits for dropped food. When I made these eggs yesterday, I made a mess. A big blob of cream fell on the floor. My dog ran over fast. He licked it right up. He wagged his tail. I smiled at him.
If I used shaving cream, I would panic. I would have to call the vet. Shaving cream makes dogs sick. But I used sweet whipped topping. It was just milk and sugar. My dog was safe. I was happy. This is why this method wins. It is safe for pets. It is safe for kids. It is safe for everyone.
Things You Need For This Project
You do not need much. You probably have these things right now. Look in your kitchen. Here is my simple list.
- Hard boiled eggs
- White vinegar
- A large tub of whipped topping
- Food coloring drops
- A flat baking tray
- A toothpick or a fork
- Paper towels
- A large glass bowl
- Cold running water
Table Comparing Dye Methods
Here is a simple look at the facts. You can see why I changed my mind.
| Method | Is it Edible? | Smell | Safe for Pets? | Safe for Kids? |
| Shaving Cream | No | Like Soap | No | No |
| Whipped Cream | Yes | Sweet | Yes | Yes |
Picking the Right Cream
You have two main choices for the cream. You can buy a plastic tub. Or you can buy a spray can. Both are safe. But they act very differently.
The Tub is Best
I like the tub of whipped topping. You buy it frozen. You let it thaw out. Brands like Cool Whip work great. Store brands work fine too. It is very thick. It holds its shape. It does not melt fast. It is cheap to buy. One tub is plenty for a dozen eggs. This is what I used on Tuesday.
The Spray Can is Tricky
Spray cans are fun. Kids love to push the button. But spray cream is full of air. It is very light. It melts very fast. When you swirl the dye, the cream turns into liquid. The colors run together. It makes a big brown puddle. I tried it once. I was sad. The eggs looked muddy. I do not use the spray can anymore. Stick to the tub.
Table Comparing Cream Types
| Cream Type | Thickness | Melt Speed | Swirl Quality | Overall Grade |
| Tub Topping | Very Thick | Slow | Excellent | A Plus |
| Spray Can | Very Thin | Fast | Poor | C Minus |
Picking the Right Dye
Food coloring comes in two forms. You can buy liquid drops. Or you can buy gel paste.
Liquid drops are cheap. They come in tiny bottles. You find them at any store. They work okay. But they can be a bit runny. The colors are nice but a bit light.
Gel paste is thick. It comes in tiny jars. Bakers use it for cakes. Gel is much stronger. The colors are very bright. I used neon pink and sky blue gel. The colors popped. I highly suggest using gel if you can find it. It makes a big difference.
How to Make the Eggs Step by Step
This is my exact process. I do this every single time. It takes some time. But it is very easy. Do not rush. Follow my steps.
Step One Boil the Eggs
Put your raw eggs in a pot. Fill the pot with cold water. Put the pot on the stove. Turn the heat up high. Wait for the water to boil fast. Turn off the heat. Put a lid on the pot. Set a timer. Wait exactly twelve minutes. This makes the perfect hard egg.
Step Two Cool the Eggs
Take the eggs out of the hot water. Put them in a bowl of ice water. Let them sit for ten minutes. This stops the cooking. It makes the shells cold. You must use cold eggs. Hot eggs will melt the cream fast.
Step Three Soak in Vinegar
This is my secret trick. Do not skip this. Put the cold eggs in a glass bowl. Pour white vinegar over them. Make sure they are covered. Set a timer for two minutes.
Vinegar is a mild acid. Real data says white vinegar is five percent acid. This acid eats the eggshell just a little bit. It makes the shell rough. You cannot see it. But the dye can feel it. The rough shell holds the color much better. The colors will be so bright.
Step Four Dry the Eggs
Take the eggs out of the vinegar. They will smell sour. That is normal. Use a paper towel. Dry them off completely. They must be bone dry. If they are wet, the dye will slide off. Put them on a dry towel. Let them rest.
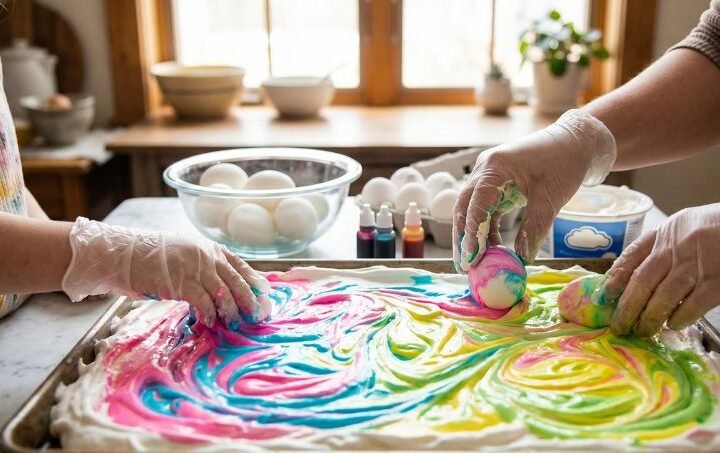
Step Five Spread the Cream
Get your flat baking tray. Open your tub of cream. Use a big spoon. Scoop all the cream onto the tray. Spread it out flat. Make an even layer. It should be one inch deep. It looks like a big white cloud. It smells very sweet.
Step Six Drop the Colors
Take your food coloring. Put drops all over the white cream. Space them out. Use red here. Use blue there. Use green over there. Do not put too many drops in one spot. Less is more. I used twenty drops in total on my tray.
Step Seven Swirl the Dye
Get a toothpick. Drag it through the drops of color. Make big loops. Make zig zags. Watch the colors mix. It looks like magic. It looks like a tie dye shirt.
But be very careful. Stop swirling early. If you mix too much, all the colors turn gray. Gray eggs are boring. You want clear lines of color. Stop when it looks pretty.
Step Eight Roll the Eggs
This is the messy part. I like to wear cheap gloves. Pick up one dry egg. Put it down on the swirled cream. Gently roll it over one time. Pick it straight up. Look at it. The shell should be covered in bright cream. Do not rub it. Just roll it once.
Step Nine Wait for the Magic
Place the messy egg on a paper towel. Leave the cream on the shell. Do not wipe it off. Do this for all your eggs. Now you must wait. This takes patience. Set a timer for fifteen minutes.
The dye needs time. It has to sink into the rough shell. The longer it sits, the darker the colors get. I like to clean my kitchen while I wait. I wash my glass bowl. I throw away my gloves.
Step Ten Wash the Eggs
The timer rings. The eggs look like messy blobs. Take one egg to the sink. Turn on the cold water. Make the water flow very gently. Hold the egg under the water. Let the water wash the cream away. Use your thumb to softly rub it.
The white cream goes down the drain. The bright colors stay on the shell. It is a great reveal. Pat the egg dry with a fresh towel. It will look like a marbled stone.
Tips for the Best Colors
I have done this many times. I have learned a few tricks. Dark colors work best. Blue and purple are great. Green is very strong. Yellow is very weak. You cannot see yellow very well on a white shell.
If you want dark red, use a lot of dye. Red can look pink if you use too little. Mix colors that play nice together. Blue and red make purple. That looks good. Red and green make brown. Try to keep red and green far apart on your tray.
What Went Wrong My First Time
I am not perfect. I make mistakes. The first time I tried this, I failed. I used hot eggs straight from the pot. I put them in the cream. The heat melted the cream instantly. It turned into milk. The dye washed right off. The eggs stayed white. I was very mad.
Another time, I skipped the vinegar step. I was in a hurry. The eggs dyed okay. But the colors were very pale. They looked washed out. The vinegar is truly the magic key. Learn from my bad days. Use cold eggs. Always use vinegar.
Cleaning Up the Sticky Mess
This project is messy. You will get cream on your hands. You will get dye on your tray. But clean up is easy. Whipped cream is mostly fat and sugar. Hot soapy water cuts right through it.
I take my baking tray to the sink. I spray it with hot water. The leftover cream melts away. I use dish soap to scrub the dye. Food dye can stain plastic. So I use a metal tray. Metal does not stain. My counter is white. If dye gets on the counter, I wipe it fast. A magic eraser sponge works great on tough spots.
Eating the Eggs Later
This is the best part. When you are done looking at them, you can eat them. They are totally safe.
I put them in the fridge. They stay cold. The next day, I crack the shell. I peel it off. Sometimes, a tiny bit of dye goes through the pores. You might see a faint blue dot on the egg white. Do not worry. It is just food dye. It has no taste.
I chop the eggs up. I add mayonnaise. I make egg salad. It tastes perfect. There is no soapy smell. There is no chemical taste. It is just a good, healthy snack. My dog even gets a plain bite of the egg white. He loves it.
Final Thoughts on Safe Egg Art
Making art should be fun. It should not cause worry. Shaving cream belongs in the bathroom. It does not belong on our food. We must think about what goes inside the shell. The pores let everything inside.
Switching to a sweet topping changed everything for me. It is cheap. It is easy. The results are stunning. Every egg is unique. They look like little painted worlds.
Next time you want to make marbled eggs, try my way. Grab a tub from the freezer. Soak your eggs in vinegar. Swirl some bright colors. Get your hands messy. Enjoy the process. Enjoy the safety. You will never go back to soap again. Your family will thank you. Your pets will thank you too. Have a great time making your safe, pretty eggs.