Baking a pie always reminds me of childhood afternoons spent in a warm kitchen, flour dust in the air, and that comforting smell of butter melting into dough. I used to think a lattice pie crust looked impossible, like something only expert bakers could manage. But after plenty of tries (and a few funny-looking pies), I learned it’s easier than it seems. Today, I want to share exactly how you can make a beautiful lattice pie crust at home, using simple steps, real-life tips, and a bit of encouragement—because if I can do it, so can you.
Why Lattice Pie Crusts Are Worth It
The first time I tried a lattice crust, I was nervous. But I discovered that lattice tops aren’t just pretty—they serve a purpose. The open pattern lets steam escape, which helps the filling set without making the crust soggy. It also gives your pie that classic, homemade look everyone loves. Plus, people are always impressed when you bring a lattice pie to the table. They think it’s harder than it is!
Ingredients You Need
For a standard 9-inch pie, you’ll need these simple ingredients:
- 2 ½ cups (310g) all-purpose flour
- 1 teaspoon salt
- 1 tablespoon sugar (optional, for sweet pies)
- 1 cup (225g) unsalted butter, cold and cut into cubes
- 6-8 tablespoons ice water
This amount makes enough for both the bottom and the lattice top.
For the filling, choose whatever you like—apples, berries, peaches, or even savory ingredients. The lattice technique works for all types.
Making The Dough: My Go-to Method
I’ve tried both by hand and with a food processor, and both work. Here’s how I do it most days:
- Mix flour, salt, and sugar in a big bowl.
- Add cold butter cubes. Use your fingers or a pastry cutter to mix until you have pea-sized bits. Don’t overwork it.
- Add ice water, 1 tablespoon at a time, mixing gently until the dough just comes together.
- Divide into two disks, wrap in plastic, and chill for at least 1 hour (overnight is even better).
Tip: Cold dough is easier to work with and holds its shape better for lattices.
Rolling Out And Prepping The Lattice
After chilling, take one dough disk out and let it sit for 5-10 minutes so it’s not rock hard. Roll it on a lightly floured surface until it’s about 12 inches wide. Lift and place in your pie dish, trim the edges, and pop it in the fridge while you work on the lattice.
Now, for the fun part: rolling out the second disk for the lattice. Aim for an even, thin sheet, about 1/8 inch thick.
Non-obvious insight: I used to struggle with sticky dough. Dusting the rolling pin and the top of the dough with flour helps a lot. If your kitchen is hot, work quickly and put the dough back in the fridge if it gets soft.
Cutting Strips Like A Pro
The classic lattice look comes from strips of dough, so you’ll need a sharp knife, pizza cutter, or pastry wheel. I prefer a pizza cutter—it’s fast and easy.
Cut the dough into strips about ½ to ¾ inch wide. You’ll need about 8-10 strips for a classic look, but you can use more or less depending on your style.
Here’s a quick look at strip width and number:
| Strip Width | Strips Needed | Pie Look |
|---|---|---|
| ½ inch | 10-12 | Classic, detailed |
| ¾ inch | 8-10 | Bold, rustic |
| 1 inch | 6-8 | Chunky, modern |
Tip: If you want an extra decorative touch, use a fluted pastry wheel for wavy edges.
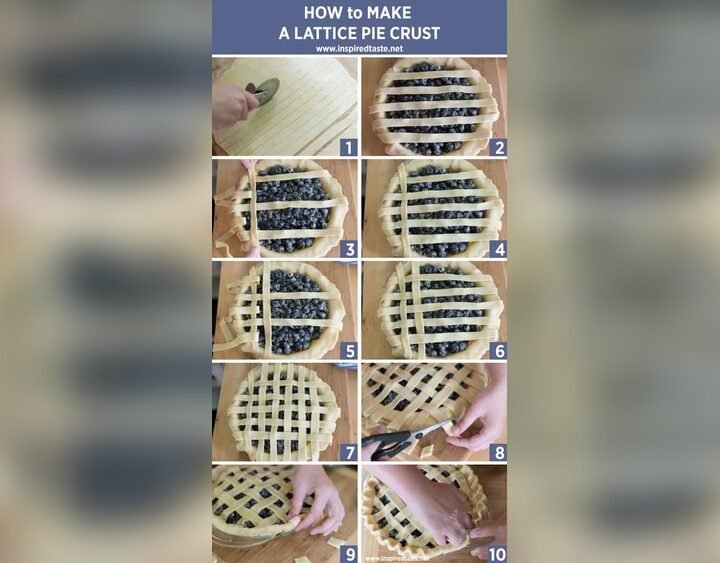
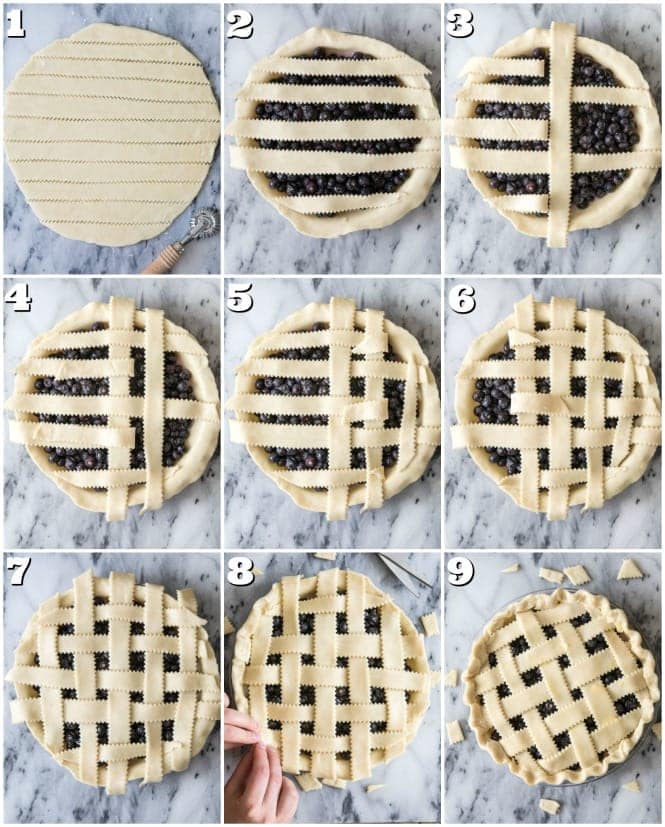
Weaving The Lattice: Step-by-step
This is where most people get nervous, but I promise it’s not hard once you see how it works. Here’s how I do it:
- Lay half the strips across the pie, spaced evenly (about 1 inch apart).
- Fold back every other strip halfway.
- Place a new strip across the pie, perpendicular to the others.
- Unfold the first set of strips over the new strip.
- Fold back the other set of strips, add the next crosswise strip, and repeat until the whole pie is covered.
It feels a bit like making a basket. If a strip tears, just pinch it back together—nobody will notice once it’s baked!
Here’s a simple breakdown of weaving:
| Step | Action | Result |
|---|---|---|
| 1 | Lay parallel strips | Base layer |
| 2 | Fold back alternates | Space for cross strip |
| 3 | Place cross strip | Start lattice effect |
| 4 | Repeat folding/adding | Complete lattice |
Non-obvious insight: Don’t worry if your strips are uneven or imperfect. Once baked, the golden color and bubbling filling make every pie look special.
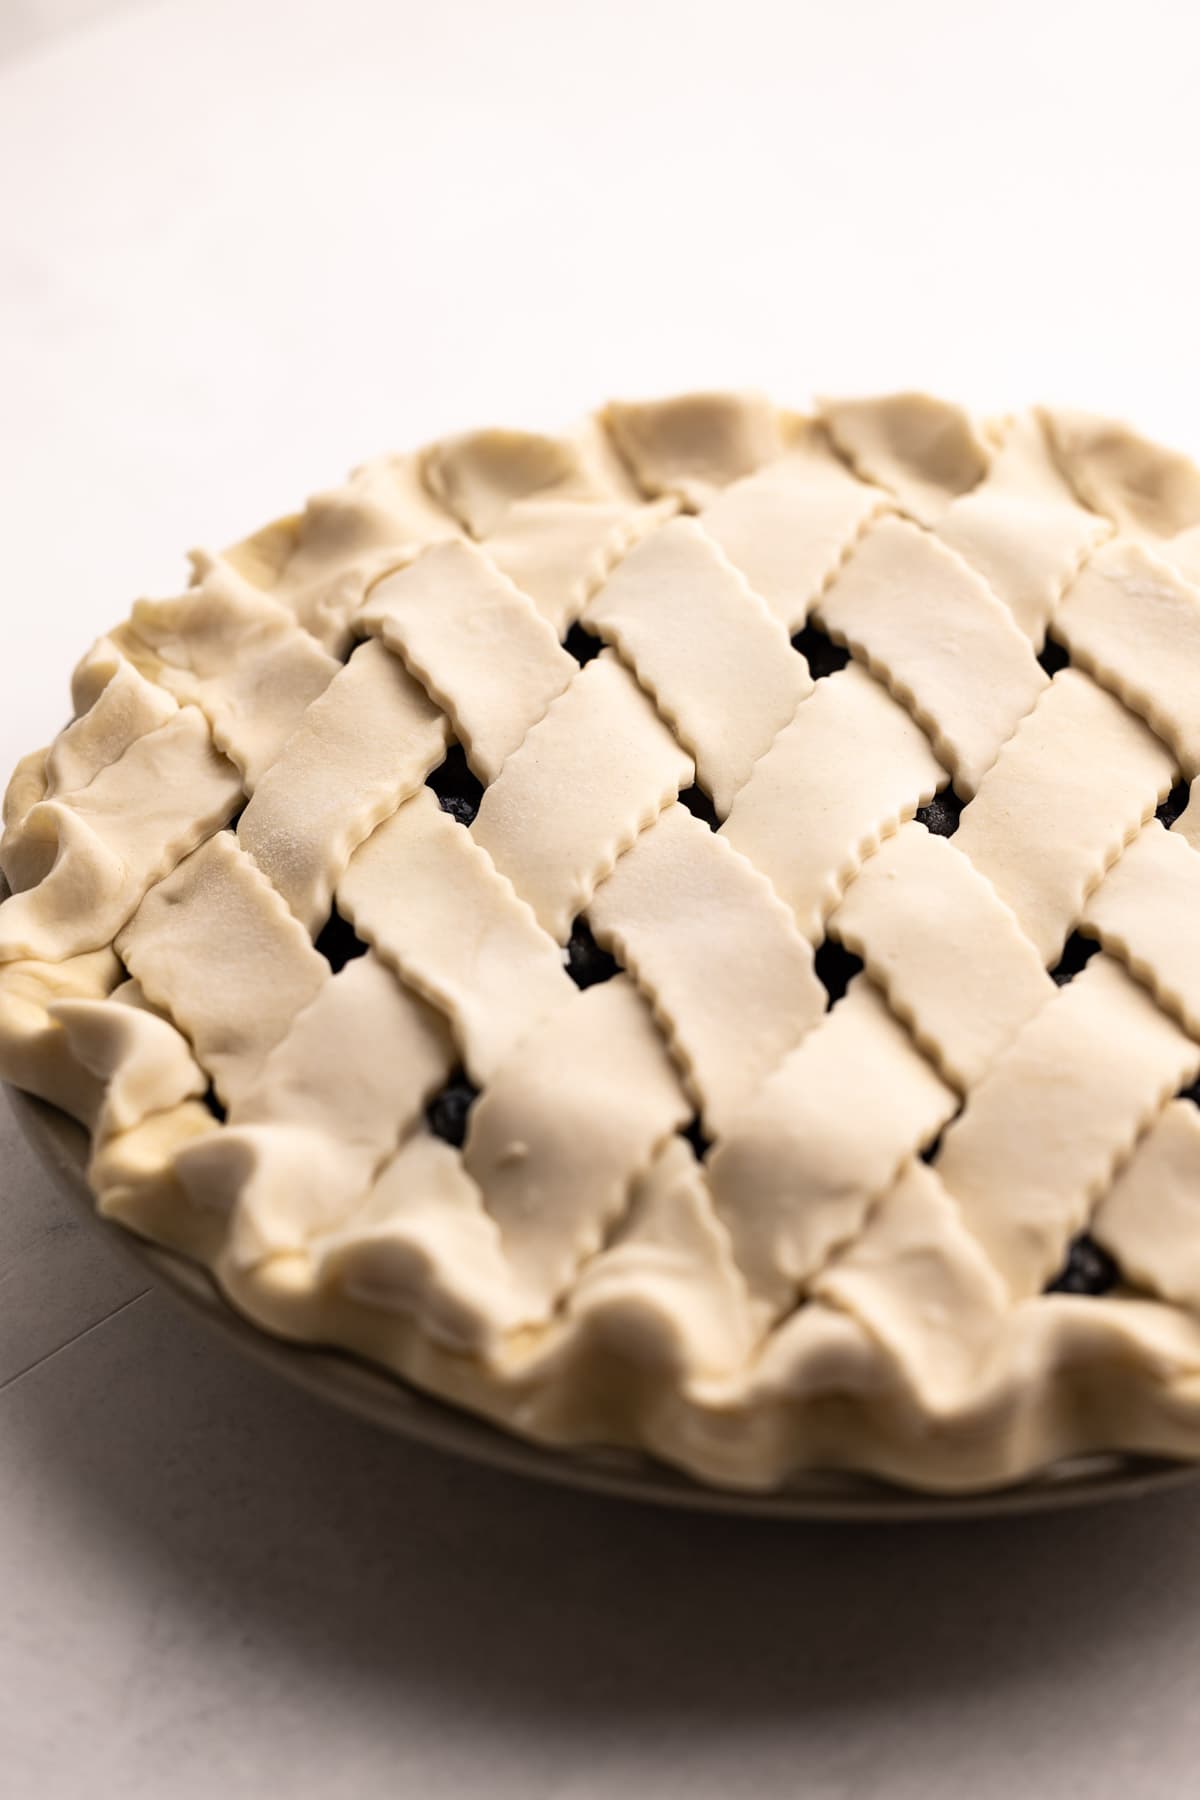
Finishing Touches
Once your lattice is woven, trim the ends of the strips so they line up with the edge of the pie. Press them gently into the bottom crust to seal. I like to flute the edges by pinching with my fingers, but you can use a fork for a neat finish.
Brush the lattice with a little beaten egg mixed with water or milk. This gives you that shiny, golden finish that looks straight out of a bakery.
Here’s a quick comparison of washes:
| Wash Type | Look | Flavor |
|---|---|---|
| Egg + Water | Glossy, deep golden | Rich, neutral |
| Egg + Milk | Softer shine | Slightly creamy |
| Milk/Cream | Matte, light brown | Mild |
Sprinkle with a little sugar if you like extra crunch.
Baking Your Pie
Bake as your recipe says. Usually, it’s 375°F (190°C) for 45-60 minutes. The crust should turn a deep golden brown, and the filling should bubble. If the edges brown too fast, cover them with foil.
Practical tip: Place your pie on a baking sheet to catch drips. Saves a lot of oven cleanup!
Where Beginners Go Wrong (and How To Fix It)
I made plenty of mistakes when I started. Here are a few, and what I learned:
- Warm dough tears easily. Chill your dough if it gets soft.
- Strips shrink in the oven. Don’t stretch them when laying them over the pie.
- Edges burn. Use foil or a pie shield if needed.
- Soggy bottom crust. Bake on a lower rack, and use a glass pie dish if you can. It helps you check for doneness.
Why Homemade Lattice Pie Crust Is Worth It
Honestly, there’s something special about serving a pie you made from scratch. The lattice crust gets crispy, flaky, and buttery—nothing like store-bought. People always ask how I did it, and I love sharing that it’s easier than they think.
For more details about pie crust history and technique, I recommend reading the article on Wikipedia.

Frequently Asked Questions
How Do I Keep Pie Dough From Sticking?
Dust your surface and rolling pin with flour. If it still sticks, chill the dough a bit longer.
Can I Use Store-bought Dough For A Lattice Crust?
Yes, but homemade dough tastes better and is easier to handle for weaving.
What Pies Are Best For A Lattice Top?
Fruit pies like apple, cherry, and berry work best. The steam release helps the filling thicken.
Why Does My Lattice Pie Crust Shrink?
Usually, the dough was stretched when placed, or it wasn’t chilled enough. Let strips rest before baking.
How Do I Get A Shiny Finish On My Lattice Crust?
Brush with a beaten egg mixed with a little water before baking.
Making a lattice pie crust took me from nervous beginner to confident baker. Every pie is a chance to create something beautiful and tasty. If you give it a try, you’ll see it’s not as hard as it looks—and the results are always worth sharing.
Happy baking!