If you’ve ever tried to cook a pork tenderloin and ended up with a chewy bite, you probably met the tough, shiny layer called silverskin. I remember the first time I made pork tenderloin for friends. I skipped removing the silverskin—big mistake! My knife couldn’t cut through some pieces, and the meat turned out less tender than I’d hoped. After that, I promised myself to never skip this step. Here’s exactly how I remove silverskin, what tools make it easier, and the little tricks I wish I knew sooner.
What Is Silverskin And Why Remove It?
Silverskin is a thin, silvery membrane on one side of the pork tenderloin. It’s not fat, and it doesn’t melt during cooking. Instead, it stays tough and chewy, even after hours in the oven or on the grill. Removing the silverskin lets your pork tenderloin cook evenly and gives you that juicy, melt-in-your-mouth texture.
Tools You’ll Need
You don’t need fancy equipment to remove silverskin, but a few basics help a lot:
| Tool | Why It’s Useful |
|---|---|
| Sharp boning knife | Makes precise, clean cuts |
| Paper towels | Helps grip the slippery meat |
| Cutting board | Keeps your workspace safe |
I’ve tried using dull knives and regular chef’s knives, but a small, flexible boning knife works best.

Credit: www.youtube.com
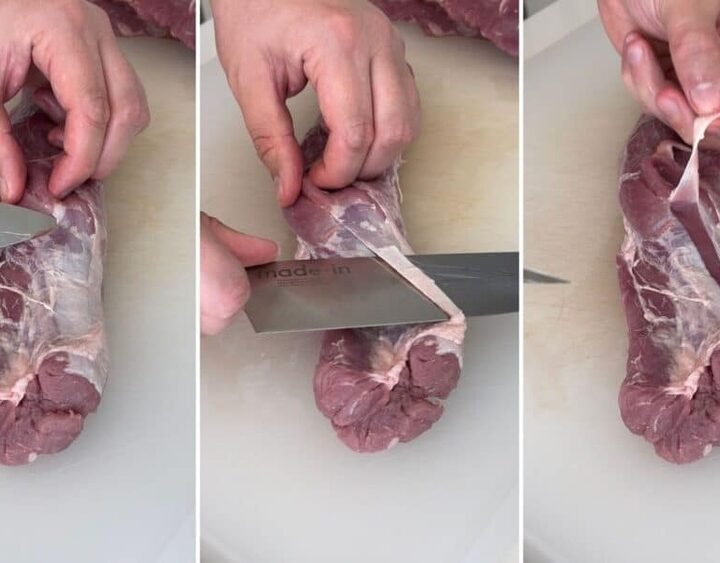
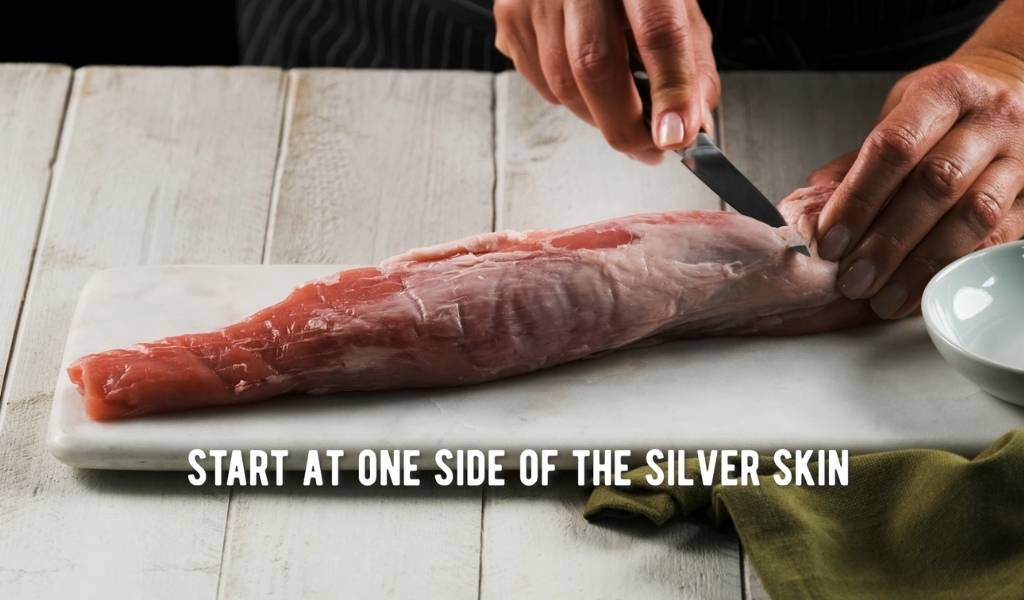
Step-by-step: Removing Silverskin
Here’s how I do it, in a few simple steps:
- Pat the tenderloin dry with paper towels. This keeps your hands and knife from slipping.
- Place the pork on a sturdy cutting board, silverskin side up. You’ll see a shiny, silvery patch running along the meat.
- Slip the knife tip under one end of the silverskin. Start at the narrow tip, not the thick end.
- Angle the blade slightly upward, just under the silverskin. Try not to cut too deep into the meat.
- Gently wiggle the knife back and forth, creating a little “tab” of silverskin to hold.
- Hold the tab with your non-knife hand, and slide the knife forward, keeping the blade just under the silverskin.
- Continue until it’s removed. If some silverskin is left, repeat the process for that area.
Here’s a quick comparison of what happens when you remove the silverskin versus leaving it on:
| With Silverskin | Without Silverskin |
|---|---|
| Chewy texture | Tender, juicy bites |
| Uneven cooking | Even, reliable cooking |
| Hard to slice | Easy to carve |
Tips I Learned Along The Way
- If the knife is tearing the meat, it’s not sharp enough. I sharpen my knife every time before starting.
- Cold pork is easier to work with. I trim the silverskin as soon as I take the tenderloin from the fridge.
- Don’t worry if some meat comes off with the silverskin. A little waste is normal, and it’s better than chewy bites.
- The silverskin is usually on just one side, but check both just in case.

Credit: www.cuisineathome.com
Common Mistakes To Avoid
- Rushing. Taking your time saves frustration later.
- Using a serrated knife. This shreds the meat.
- Forgetting to dry the meat first. Wet meat slips around and is harder to handle.
Frequently Asked Questions
How Do I Know If I Got All The Silverskin?
Look for any shiny, silvery patches left. They should be completely gone. Some thin patches of fat are okay to leave.
Can I Use A Regular Kitchen Knife?
You can, but a sharp boning knife makes it much easier. The flexible blade helps you stay close to the silverskin.
What Happens If I Leave The Silverskin On?
The cooked pork will be chewy and harder to slice. It won’t ruin the meal, but it’s not as good.
Is Silverskin Safe To Eat?
Yes, it’s safe, but it’s very tough and not pleasant to chew. Removing it improves the eating experience.
Where Can I See A Video Demonstration?
I recommend watching a quick how-to on YouTube for a visual guide.
Removing silverskin might take a few extra minutes, but it’s always worth it. My pork tenderloin is now tender every time. Once you do it a couple of times, it becomes second nature. If you want more background on silverskin, check out this Wikipedia article. Happy cooking!
Credit: ontarioporkrecipes.ca