

I’ve tried this with both meat cutlet and chicken cutlet, and trust me, they both turn out amazing. After making this dish countless times in my own kitchen, I can confidently say it’s always a hit — no matter who’s at the table.
When I’m in a rush or just need dinner on the table fast, I reach for store-bought curry roux. It still brings out that deep, hearty taste that makes this sauce shine. The key here, and what I’ve learned from lots of trial and error, is to keep the curry thick and comforting. That way, when you lay it over those panko-breaded cutlets, the cutlets stay perfectly crispy. That awesome contrast of crunchy and saucy is exactly what makes katsu curry so special. It answers that common question I get — “How do I keep my cutlet from going soggy?” — by simply focusing on sauce texture.
It’s kind of funny, but I enjoy making this just as much as when I prep dishes like Yangzhou Fried Rice (Cơm Chiên Dương Châu) or try something playful like Lasagna Soup Recipe (with a Vietnamese Twist). Each recipe brings something new to the table. Yet the real joy for me, and maybe you feel this too, is how sharing a homemade meal always feels so personal. That connection is part of what keeps me passionate about cooking.
What is Japanese Katsu Curry?
Japanese curry is one of those dishes you can never get enough of. It’s the perfect balance of crispy cutlet, panko breadcrumbs, and a smooth, rich curry sauce that makes it so satisfying. The dish is often served over steamed Japanese rice, which soaks up all the delicious flavors. Katsu, which means “cutlet” in Japanese, is usually made from pork or chicken. If you use pork, it’s called tonkatsu, and the crispy breading adds an incredible textural contrast to the curry.
I remember the first time I made this dish at home. My husband couldn’t stop talking about how much he loved the crunchy texture of the katsu with the warm spices of the curry. He’s always asking for it on top of his rice! It’s no surprise it’s the ultimate comfort food in Japan. It’s so easy to make and has that perfect combination of flavor and texture. Whether you’re at a specialty curry restaurant or in your own kitchen, you can’t go wrong with a good katsu curry. Plus, it’s always a hit when you’re craving something comforting, hearty, and flavorful.
Why this recipe works:
- The katsu sauce is rich, creamy, and has a zingy kick from ginger.
- Breaded chicken is crispy, adding a perfect texture.
- Baking the chicken keeps it crispy with fewer calories.
- You get more sauce per serving for extra flavor.
- It’s a hearty, comforting meal loved by my family.

Japanese Katsu Curry Ingredients
Katsu
When making Japanese Katsu Curry, the right ingredients make all the difference. I like using chicken breast or meat chops for the protein. These are easy to work with and stay tender when cooked. To get that perfect crispy coating, you’ll need flour, eggs, and panko breadcrumbs. Panko gives a great crunch that’s hard to beat. For seasoning, just add salt, pepper, garlic powder, ginger powder, and onion powder. They make the dish pop with flavor. When frying, use neutral oil like canola or avocado oil. These oils won’t overpower the taste of the food and help you get that perfect golden-brown crunch.
I’ll be honest, the first time I made katsu, I was nervous. But once I got the hang of it, it became one of my go-to dishes. The key is to fry it until the coating is perfectly crispy and golden.
Katsu Ingredients
- Boneless meat chops or pork or chicken breast
- Flour
- Eggs
- Panko breadcrumbs
- Salt, pepper, garlic powder, ginger powder, and onion powder
- Neutral oil (like canola or avocado oil) for frying
Japanese Curry
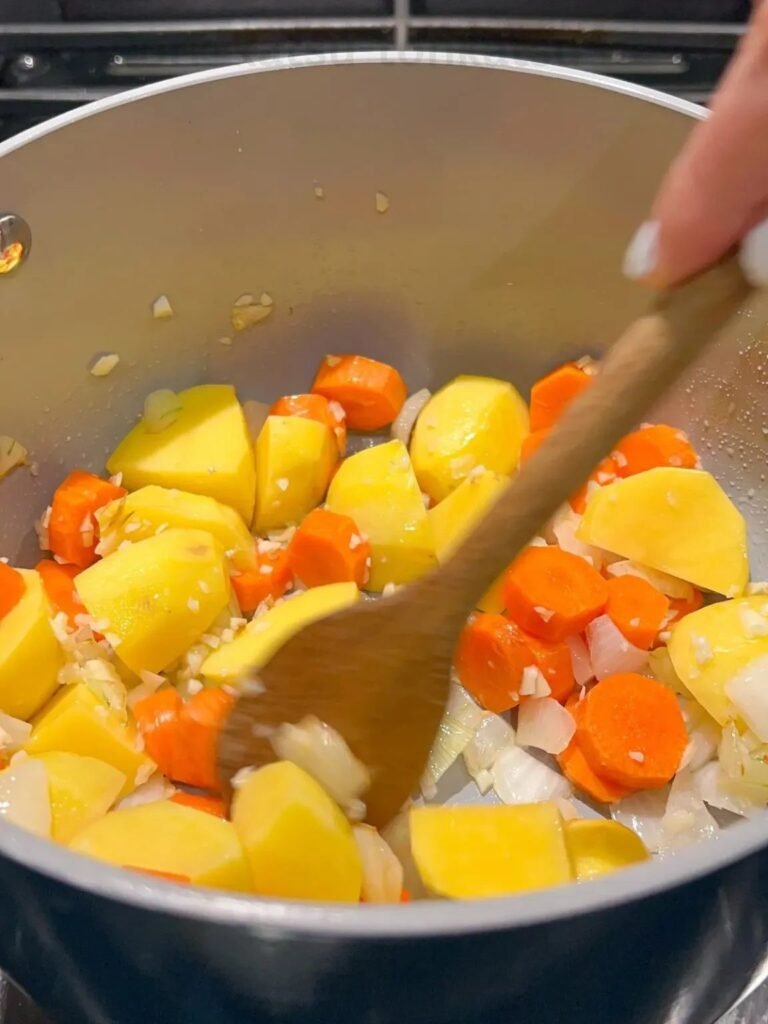
Next comes the curry. You want a good base with onion and garlic. They bring out a rich flavor in the sauce. I add in carrots and baby potatoes. They soak up the curry and make the dish hearty. I use Golden Curry mix, which is quick and always tastes great. The water you add depends on how thick or thin you like your curry. If you want a bit of sweetness, you can grate a Fuji apple into the sauce. It balances out the flavor and gives it a nice touch. For the final touch, top the curry with some green onions. They add freshness and a mild onion flavor that cuts through the richness.
I remember the first time I added apple to the curry. I wasn’t sure about it, but after tasting it, I loved how it brought all the flavors together.
Japanese Curry Ingredients
- Onion and garlic
- Vegetables
- Carrots and baby potatoes
- Golden Curry mix (or your favorite curry mix)
- Water (to adjust thickness)
- Fuji apple (optional for sweetness)
- Green onions for garnish
How to Make Japanese Katsu Curry
When I’m in my kitchen, I love to make this flavorful, Japanese dish with my Thai Red Curry. It’s so comforting, especially on cold days. Cooking katsu at home is easy. I always start by getting things ready step-by-step. That way, it’s easily set up. I’ve even done a video tutorial to save and print later.
Having a breakdown really helps when you want to recreate this luscious curry at home. It always warms you up and feels super cozy. From what I’ve learned, adding just the right spice gives it a nice kick. That’s something I always mention when I share my instructions. Cooking like this makes you and I enjoy it even more. It’s about taking each part at its best. Don’t rush both the crispy cutlet and the rich sauce.
How to Make Katsu
Now, I make it simpler by focusing on the basics first. By doing this, I get a crispy, flavorful katsu every time, and it saves me tons of time. Trust me, it’s faster, and you still get great results!
Step 1: Prepare Protein
Make Katsu, I start by preparing my protein—either meat or chicken.
I make sure to pound the boneless cutlets until they are thin but still firm. This step is key to keeping the meat tender and juicy. I’ve learned that if the cutlets are too thick, they can become tough when frying.
Once they’re the right thickness, I’m ready to move on to the next step.

Step 2: Breading
Set up my breading station. I use flour, an egg wash, and panko breadcrumbs.
The panko is what gives the cutlet that crunchy, crispy texture. To make the breading extra flavorful, I season the flour with garlic powder, onion powder, ginger powder, and salt.
When I coat the cutlet, I make sure to press the meat into the panko to ensure it sticks and gets full coverage. This extra pressing step is a trick I learned over time to get a better, crispier result.

Step 3: Frying
For the frying step, I heat oil in a large pan over medium heat. Before placing the cutlet in the pan, I always test the oil with a small piece of bread or panko. If it bubbles up quickly, I know the oil is ready.
I fry the cutlet until it’s golden brown on both sides. It’s crucial to keep an eye on the internal temperature and make sure it hits 145°F. I remember the first time I overcooked a cutlet, and it turned out dry.
Now, I monitor the temperature carefully, and my katsu always comes out perfectly juicy and crispy. Once fried, I place the cutlet on a paper towel or a rack to drain any extra oil, keeping the crust nice and crisp.
How to Make Japanese Curry
Step 1: Sauté
Make Japanese Curry, I start by heating oil in a pan over medium heat. I sauté onions, garlic, and carrots until the onions turn translucent. The smell is incredible. This step really helps bring out the flavors.
I’ve learned over time that taking the time to sauté these ingredients properly makes a big difference in the final taste.
After that, I add the chicken (or meat) and cook it until it’s lightly browned. This step helps develop extra flavor and gives the meat a nice texture.

Step 2: Curry Mix
Add bouillon cubes, water, and broth to create the base. I always use chicken broth because it adds the most flavor. After stirring everything together, I add Golden Curry mix or pre-made roux.
This is the easy part—just stir, and let it simmer. The mix helps thicken the sauce and adds depth. I let everything cook until the ingredients are tender. To enhance the flavor even more, I add a tingle of spices and a little flavor powder.
I’ve found that a small amount of Caraway gives it a unique taste.
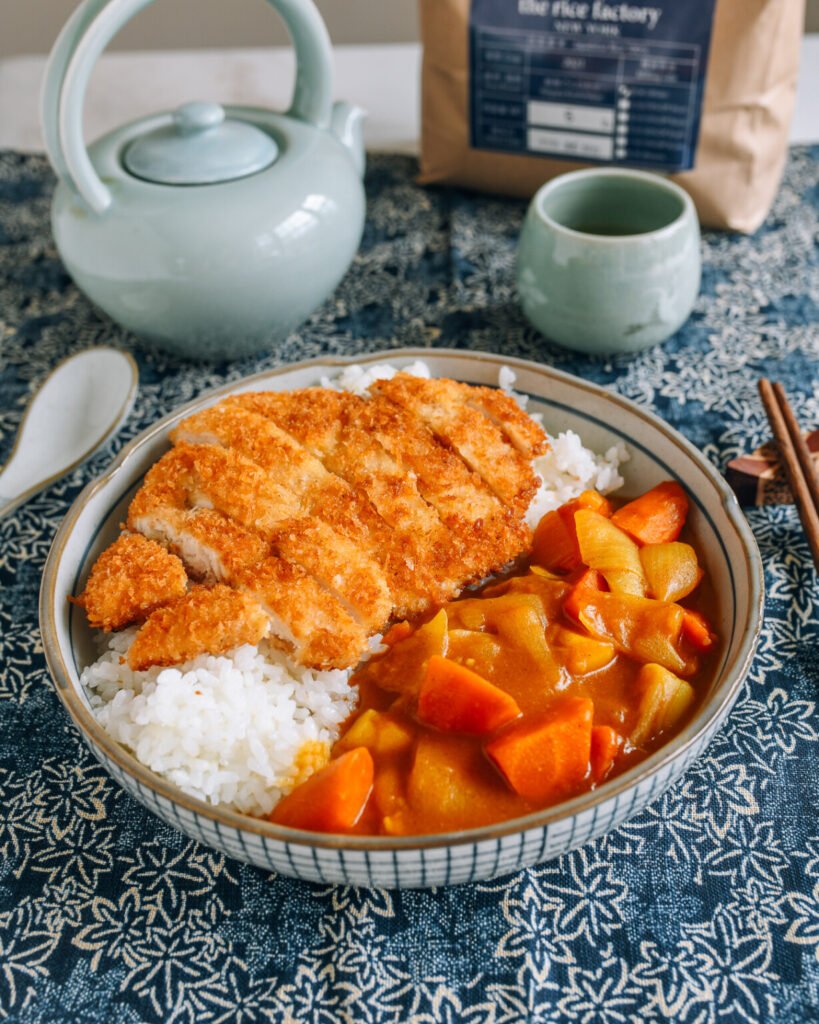
Step 3: Serving Japanese Katsu Curry
Lastly, I check the consistency of the curry. It should be thick enough to coat the rice. Once the sauce is just right, I serve the curry over rice or alongside crispy katsu.
I love to finish it off with a sprinkle of green onions for a fresh and vibrant touch.
This method is my go-to for a quick, yet delicious, savory curry that is full of flavor and super easy to make.
Leftover Storage & Reheating
- Separate the katsu from the curry sauce:
I always separate the katsu from the curry sauce before storing. This prevents the crispy breading from getting soggy. It’s something I’ve learned after trying different methods. When they’re stored together, the breading loses its crunch. I now use an airtight container for the best results. - Seal tightly for freezing:
If you’re planning to freeze your katsu curry, it’s important to seal everything tightly. This stops any water or condensation from getting in. I’ve had freezer burn before when I forgot to seal properly. Trust me, you don’t want that! Ensuring a tight seal keeps the flavors fresh for later.
Serve with Japanese Katsu Curry
I usually serve my chicken katsu curry or meat katsu curry over steamed rice.
The rice soaks up all that savory curry, kind of like how a Single serve sushi bake melds its creamy layers right into the rice. It’s the same comfort factor, just expressed differently, and it never fails to make people smile. If you’re wondering what else you could pair this with, think simple — it works beautifully on a busy night when you want something that’s quick yet deeply satisfying.
When I’m not craving something warm and hearty like this, I’ll switch gears and whip up something lighter, maybe a little Vietnamese-style yogurt (Sữa chua) for dessert, or even a bright bowl of Vietnamese Opo Squash Soup (Canh Bầu Tôm). It’s really all about balance. That’s something I’ve come to appreciate more over the years — learning how to listen to what my body actually wants.
Honestly, whether I’m dipping crispy bites into Vietnamese Fish Sauce Dipping Sauce (Nước Chấm), adding a drizzle of Thai Seafood Sauce, or even topping leftovers with a pop of Spicy Tuna Crispy Rice, it’s this variety that keeps cooking fresh for me.
I find a lot of joy exploring different flavors right in my own kitchen. It answers that deeper craving for creativity and discovery.
Japanese Katsu Curry might seem simple, but it’s truly comforting.
Every time I dig into it, I remember why I keep coming back to this dish, again and again. And I hope you’ll get to experience that same cozy satisfaction at your own table with my Restaurant-Style Ramen Eggs.
More Recipes You Might Like

Japanese Katsu Curry: Easy Flavorful Recipe
Description
Japanese Katsu Curry is a cozy dish with crispy chicken and rich curry sauce. It’s sweet, savory, and full of flavor. You can make it easily at home with simple steps. Serve it with warm rice for a meal that feels like comfort in a bowl.
Ingredients
Katsu:
Japanese Curry:
Instructions
- Read the steps first. It helps you see what comes next and makes cooking easy.
- Prepare all ingredients. Slice the meat, measure the sauce, and have everything ready before you start.
- Follow each step slowly. Don’t rush. Take your time to fry the katsu until golden and make the curry smooth.
- Serve fresh and hot. Pour the curry over rice and top it with crispy katsu. Enjoy right away for the best flavor.
Nutrition Facts
Servings 4
Serving Size 1 cup of Japanese Katsu Curry
- Amount Per Serving
- Calories 750kcal
- % Daily Value *
- Total Fat 28g44%
- Saturated Fat 6g30%
- Trans Fat 0.5g
- Cholesterol 150mg50%
- Sodium 1200mg50%
- Potassium 900mg26%
- Total Carbohydrate 85g29%
- Dietary Fiber 5g20%
- Sugars 8g
- Protein 35g70%
- Vitamin A 7000 IU
- Vitamin C 20 mg
- Calcium 80 mg
- Iron 4 mg
- Vitamin D 30 IU
- Vitamin E 2.5 IU
- Vitamin K 25 mcg
- Thiamin 0.6 mg
- Niacin 12 mg
- Vitamin B6 1 mg
- Biotin 5 mcg
- Phosphorus 300 mg
- Iodine 30 mcg
- Magnesium 60 mg
- Chromium 5 mcg
- Molybdenum 10 mcg
- Chloride 900 mg
* Percent Daily Values are based on a 2,000 calorie diet. Your daily value may be higher or lower depending on your calorie needs.
Note
- Use panko-breaded chicken or pork cutlets for the best crispy texture.
- Serve over steamed rice so it soaks up the rich, savory curry sauce.
- A bit of spice adds warmth, making it perfect for cold days.
- This dish is cozy, flavorful, and real comfort food for the whole family.
- Easy to make at home by following a step-by-step process.
- Enjoy the balance of crunchy and saucy in every bite.
