I remember the first time I tried making peanut butter and jelly cups at home. I wanted something sweet but not loaded with sugar, something I could grab quickly and not feel guilty about.
Most store-bought snacks had ingredients I couldn’t pronounce or contained gluten, so I decided to experiment with a healthier version. What I ended up with was a snack that’s not just vegan and gluten free—it’s also crazy delicious and super easy to make.
Why Peanut Butter And Jelly Cups Are The Perfect Snack
If you’re like me, you grew up with PB&J sandwiches. They’re nostalgic, comforting, and simple. But when you turn them into cups, you get a snack that’s portable, mess-free, and feels a bit more special. Plus, these cups fit nearly every diet: they’re vegan, gluten free, and don’t use any refined sugar.
I also love that you can prep them ahead. On busy days, I just grab one from the fridge. They’re great for after workouts, school lunches, or whenever you need a quick energy boost. Compared to traditional PB&J sandwiches, these cups are lower in carbs, higher in healthy fats, and won’t spike your blood sugar.
Here’s a quick comparison of nutrition:
| Snack Type | Calories | Sugar (g) | Protein (g) | Gluten Free |
|---|---|---|---|---|
| PB&J Sandwich | 350 | 16 | 12 | No |
| PB&J Cups (Homemade) | 210 | 8 | 7 | Yes |
Ingredients And Substitutions
The beauty of these cups is how simple the ingredient list is. You don’t need fancy equipment or rare foods. Here’s what I use for about 12 cups:
- 1 cup creamy natural peanut butter (or almond butter for nut allergies)
- 1/4 cup pure maple syrup (or agave for lower GI)
- 1/2 cup gluten free oat flour (or almond flour)
- 1/2 cup fruit jam (look for 100% fruit or make your own)
- 1 cup vegan chocolate chips
- 2 tablespoons coconut oil (helps chocolate set)
If you want to cut down on sugar, choose a jam with no added sugar or blend fresh berries. For nut-free options, sunflower seed butter works well.
I learned that the quality of your peanut butter matters a lot. Avoid brands with palm oil or extra sugar. The same goes for jam—the fewer ingredients, the better.
Here’s a handy table showing possible swaps:
| Original Ingredient | Alternative | Why Use It? |
|---|---|---|
| Peanut Butter | Almond Butter / Sunflower Butter | Nut allergies or flavor |
| Oat Flour | Almond Flour | Extra protein, gluten free |
| Maple Syrup | Agave / Date Syrup | Lower glycemic index |
| Chocolate Chips | Dark chocolate pieces | Less sugar, richer taste |
Step-by-step: Making Healthy Pb&j Cups
When I first made these, I was surprised by how little effort it took. Here’s the process I use, broken down so anyone can follow.
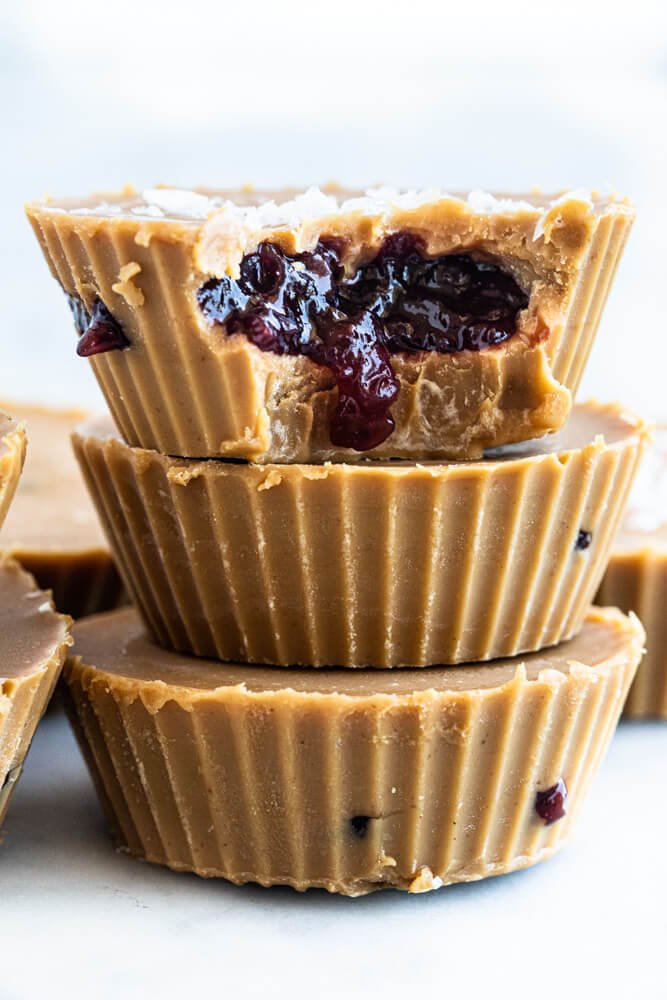
- Mix the base: Combine peanut butter, maple syrup, and oat flour in a bowl. Stir until you get a thick dough.
- Press into cups: Line a mini muffin tin with paper liners. Scoop about a tablespoon of the dough into each cup and press down to form a base.
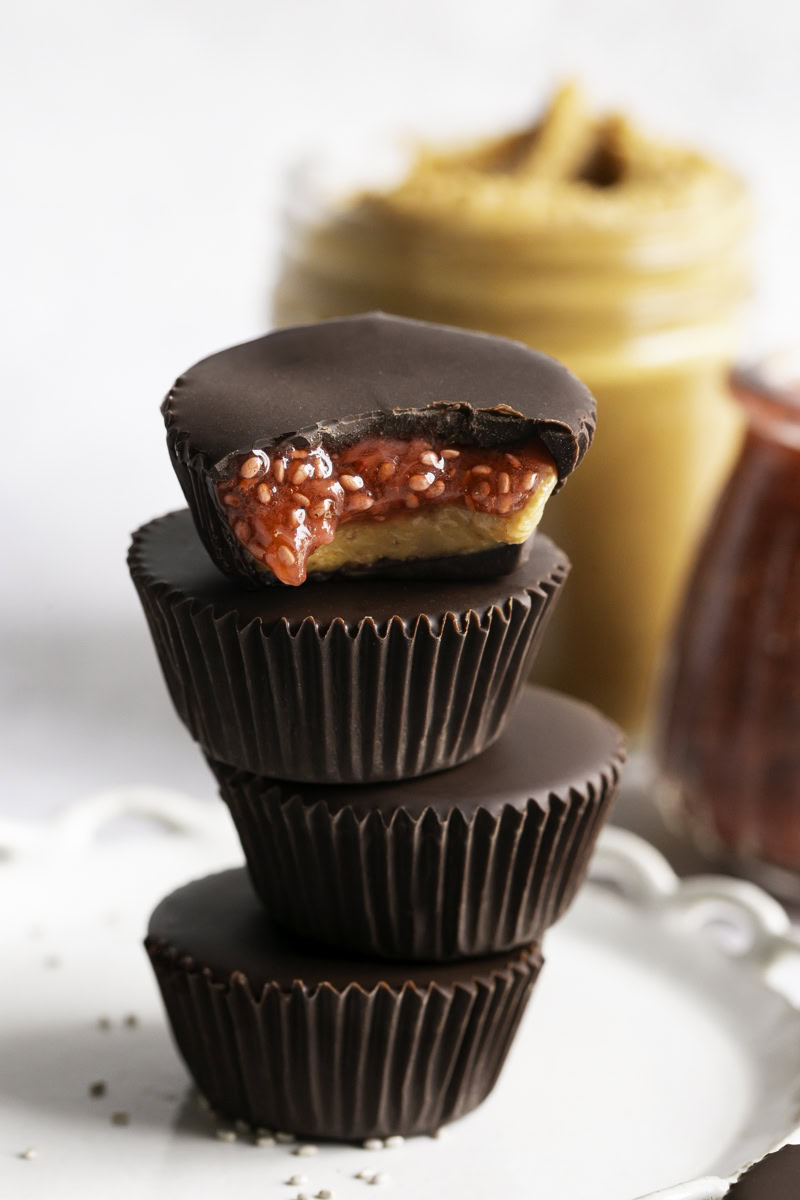
- Add the jam: Spoon half a teaspoon of jam onto each base. Spread gently so it stays in the center.
- Melt chocolate: In a microwave or on the stove, melt chocolate chips with coconut oil. Stir until smooth.
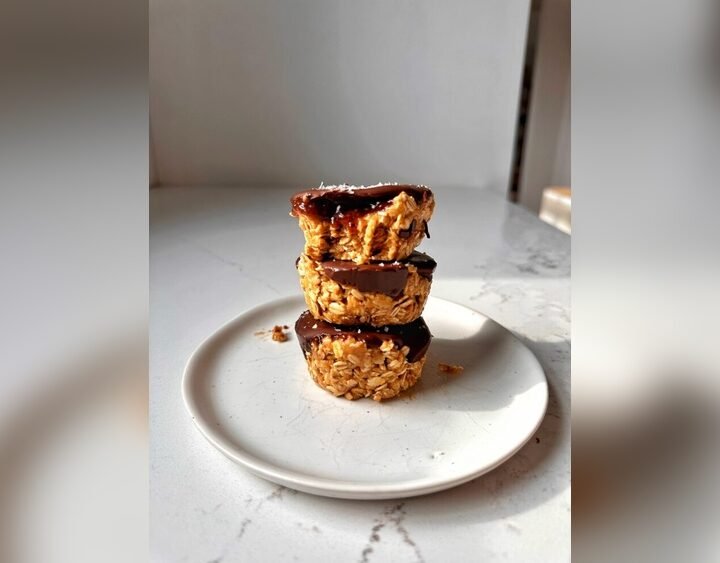
- Cover with chocolate: Pour melted chocolate over each cup. Tap the tin gently to level the surface.
- Chill: Place the tin in the freezer for about 30 minutes, or until set.
The whole process takes under 15 minutes (plus chilling time). I often double the recipe because they disappear fast in my house.
My Tips For Perfect Cups
- Use silicone molds for easy removal.
- Don’t overfill with jam, or it leaks out.
- Let the cups sit at room temp for 5 minutes before eating for softer texture.
One thing I noticed after making these a few times: homemade cups are way less sweet than store-bought bars, but you can adjust the sweetness by adding more maple syrup if you like.
Why These Cups Are Actually Healthy
I used to worry that snacks like these would be just as unhealthy as candy. But the truth is, these cups are packed with healthy fats, fiber, and protein. Peanut butter and oat flour help keep you full. The chocolate is just enough to satisfy cravings without overdoing sugar.
Compared to most packaged snacks, you’re getting:
- No gluten
- No dairy
- No refined sugar
- No artificial flavors
They’re also great for meal prep. I make a batch on Sunday, and they stay good for up to two weeks in the fridge. If you freeze them, they last even longer.
Here’s a quick storage comparison I’ve learned from experience:
| Storage Method | Texture | Max Freshness |
|---|---|---|
| Fridge | Soft, chewy | 2 weeks |
| Freezer | Firm, dense | 1 month+ |
Real-life Results And Improvements
After a few batches, I learned some tricks. For example, if you use homemade jam, the flavor is much fresher. One time, I mixed strawberries with chia seeds and a splash of lemon juice. It tasted amazing and added extra fiber.
But I also noticed that if you skip the coconut oil, the chocolate layer turns out harder and sometimes cracks. So don’t skip it unless you like a firmer bite.
Another thing: these cups aren’t as sweet as candy bars. If you’re used to really sugary snacks, they might feel less rich. But for me, that’s a plus. I can eat two or three without feeling sluggish.
Sometimes, I add a pinch of sea salt on top for a flavor boost. It makes the peanut butter pop and balances the sweetness.
Sharing With Friends And Family
Whenever I bring these to gatherings, people are surprised they’re vegan and gluten free. Kids love them, and adults appreciate the healthier twist. I’ve even had friends ask for the recipe after tasting just one cup.
If you want to make them for a crowd, just double the recipe and use regular muffin tins. They look cute and colorful with different jams—try blueberry, raspberry, or peach.
I find these cups are perfect for Pinterest because the photos look beautiful, and the recipe is simple enough for anyone to try.
If you want more info on vegan snacks, check out Vegan Society for reliable guides.

Frequently Asked Questions
How Long Do Peanut Butter And Jelly Cups Last?
Stored in the fridge, they stay fresh for up to two weeks. In the freezer, they can last a month or more.
Are These Cups Suitable For Kids?
Yes! They’re safe for most allergies (if you use seed butter) and contain less sugar than most snacks. Just cut them into smaller pieces for toddlers.
Can I Use A Different Nut Butter?
Absolutely. Almond, cashew, or sunflower seed butter all work. The texture may change slightly, but the flavor is still delicious.
Is It Possible To Make These Sugar Free?
Yes. Use a jam with no added sugar or blend fresh fruit with chia seeds. You can also skip the maple syrup, but the cups will be less sweet.
What’s The Best Way To Melt Chocolate?
Microwave in 30-second bursts, stirring each time. Or use a double boiler for more control and prevent burning.
Making these healthy peanut butter and jelly cups has become a staple in my kitchen. They’re quick, flexible, and genuinely satisfying. If you’re searching for a snack that feels good and tastes great, give them a try—you might be surprised at how easy and addictive they are!