Rice is one of those foods I make almost every week. Over time, I’ve tried many methods—boiling, steaming, using a rice cooker. But I always come back to the absorption method. It’s simple, doesn’t need fancy tools, and gives perfect fluffy rice every time. I want to share what I’ve learned, including the little tricks that made a big difference for me. If you want rice that’s never mushy, never burned, and always just right, you’re in the right place.
What Is The Absorption Method?
The absorption method is a way to cook rice where you use just enough water so the rice soaks it all up as it cooks. There’s no draining or rinsing at the end. Everything goes in one pot, and the rice does its thing.
This method is common in many homes, and it works for all kinds of rice—white, brown, basmati, jasmine.
I love it because it keeps the rice’s flavor and nutrients locked in. Plus, I don’t have to watch the pot all the time. Once you know the basics, it’s easy to do, even on busy days.
Ingredients And Tools You Need
Let’s keep it simple. Here’s what I use every time:
- 1 cup rice (white long-grain is my go-to, but you can adjust for other types)
- 2 cups water (for white rice; see my chart below for other types)
- 1/2 teaspoon salt (optional, but brings out flavor)
- 1 teaspoon oil or butter (optional, for extra taste and less sticking)
For tools, you just need:
- A medium saucepan with a tight-fitting lid
- A measuring cup
- A fork for fluffing
I’ve tried using old pots and even a camping pan once. As long as the lid fits well, you’re good.

Credit: www.youtube.com
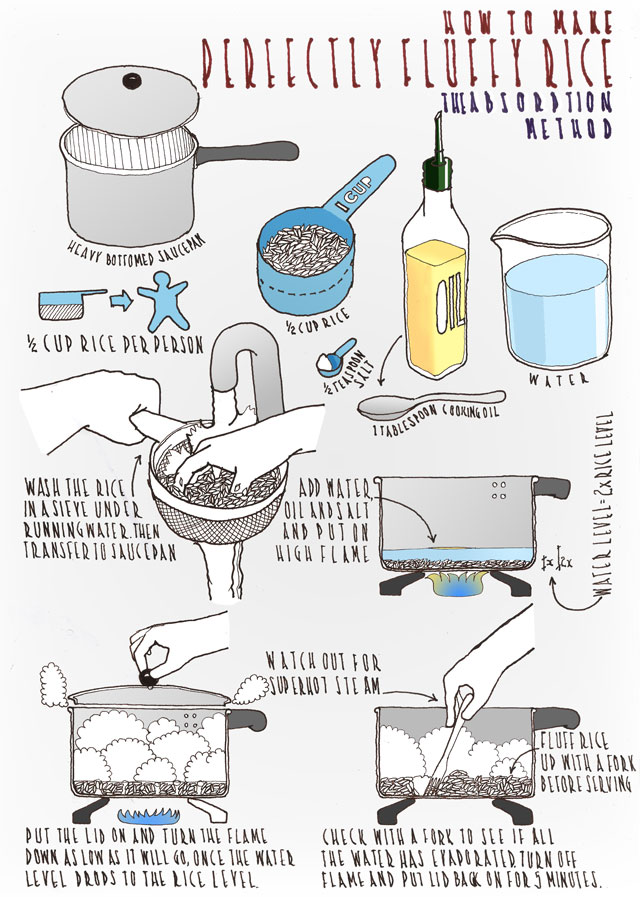
Step-by-step: How I Cook Rice The Absorption Way
Here’s how I cook rice at home, step by step. I’ll add some personal notes along the way.
1. Measure Your Rice
I always measure the rice first. Too much or too little water changes everything. For one or two people, 1 cup rice is enough.
2. Rinse The Rice
This step matters! I put the rice in a bowl, cover with cold water, swirl it, then pour off the water. I do this 2–3 times. This removes extra starch and stops the rice from getting sticky or gummy.
3. Add Water, Salt, And Oil
I pour the rinsed rice into the saucepan. Then I add 2 cups water for every cup of white rice. For brown rice, I use a bit more (see the table below). Salt and oil go in now too.
4. Bring To A Boil
I set the pan on medium-high heat and wait for it to boil. I don’t walk away—this part is quick. When I see bubbles on the surface, I give the rice one gentle stir.
5. Cover And Simmer
This is where the magic happens. I turn the heat down to the lowest setting and put the lid on tight. No peeking! The rice needs steam to cook through. For white rice, I set a timer for 15 minutes.
6. Rest And Fluff
When the timer goes off, I turn off the heat and let the rice sit, covered, for 10 more minutes. This lets the last bit of moisture even out. Then I fluff the rice with a fork. It’s always tempting to dig in right away, but this step really helps.
Water-to-rice Ratios For Different Types
I learned the hard way that not all rice is the same. Here’s a quick guide I wish I’d had when I started:
| Rice Type | Water (per 1 cup rice) | Cooking Time |
|---|---|---|
| White Long-Grain | 2 cups | 15 min simmer, 10 min rest |
| Brown Rice | 2.5 cups | 35 min simmer, 10 min rest |
| Jasmine Rice | 1.75 cups | 12 min simmer, 10 min rest |
| Basmati Rice | 1.5 cups | 12 min simmer, 10 min rest |
If you’re switching rice types, adjust your water and time. Otherwise, you’ll get soggy or crunchy results.
Common Mistakes And How To Avoid Them
Cooking rice seems easy, but I’ve made every mistake you can think of. Here are a few things I learned:
- Lifting the lid while cooking lets steam out. I used to check every few minutes, and the rice always came out undercooked.
- Too much water makes rice mushy. I once added a “little extra” for luck—bad idea.
- Not letting it rest after cooking. The rice needs that last 10 minutes to finish up. Skipping this means wet rice at the bottom.
- Wrong pot size. If the pot’s too big, water evaporates too fast; too small, it boils over.
Here’s a quick comparison of mistakes and their effects:
| Mistake | Result | How to Fix |
|---|---|---|
| Lifting lid | Undercooked rice | Keep the lid on tight |
| Extra water | Mushy rice | Measure water carefully |
| Skipping rest | Wet or clumpy rice | Let rice sit, lid on, after cooking |
My Favorite Tips For Better Rice
After lots of trial and error, I found these tips make rice even better:
- Let the rice steam with the lid on after cooking. This extra time stops soggy spots.
- Try a splash of lemon juice in the water for fluffier grains.
- Use broth instead of water for more flavor.
- Don’t stir while simmering. It breaks grains and releases starch.
One day, I was in a rush and forgot to rinse my rice. It came out sticky and stuck to the bottom. Since then, I never skip that step.

Credit: www.youtube.com
How Does Absorption Method Compare To Other Methods?
I’ve used rice cookers, boil-and-drain methods, and even the microwave. For me, the absorption method gives the best texture. It uses less energy and time than boiling, and I don’t need extra gadgets. Plus, it’s easy to scale up for a family dinner or cook just a small amount for lunch.
Here’s how the absorption method stacks up against other ways:
| Method | Texture | Tools Needed | Effort |
|---|---|---|---|
| Absorption | Fluffy, separate grains | Pot & lid | Low |
| Rice Cooker | Soft, sometimes sticky | Rice cooker | Very low |
| Boil & Drain | Softer, less flavor | Pot, strainer | Medium |
Real-life Context: Why I Use This Method
I started cooking rice this way during busy workdays. I wanted a side dish that didn’t need babysitting. Now, it’s my go-to for meal prep, dinner parties, or just a quick lunch. The absorption method is forgiving—even if you’re new to cooking, you’ll get good results.
One thing I noticed: when I serve rice cooked this way, people always ask how I made it so fluffy. That’s a nice feeling!
If you want to read more about rice cooking techniques, I recommend this Wikipedia article on rice cooking.
Credit: thenewvitruvianman.com
Frequently Asked Questions
How Do I Fix Rice If There’s Water Left After Cooking?
If there’s a little water left, put the lid back on and let the rice sit for 5–10 more minutes off the heat. The rice usually absorbs it. If there’s a lot, cook on very low heat, lid off, until the water evaporates.
Can I Use The Absorption Method For Brown Rice?
Yes, just use more water and a longer cooking time. For 1 cup brown rice, use 2. 5 cups water and simmer for 35 minutes, then let it rest as usual.
Why Does My Rice Stick To The Bottom?
Sticking usually means the heat was too high or there wasn’t enough water. Try cooking on lower heat and adding a bit of oil or butter.
Can I Double Or Triple The Recipe?
Absolutely! Just keep the same ratios. Use a bigger pot so the rice has room to expand and cook evenly.
Is Rinsing Rice Always Necessary?
For the best texture, yes. Rinsing removes extra starch so your rice is fluffy, not sticky. For some dishes, like risotto, you want it sticky—but not with the absorption method.
Cooking rice with the absorption method has made my meals easier and better. With a little practice, you’ll get perfect rice every time—no stress, no special tools. Give it a try and see how it changes your kitchen routine.